Before starting with silver soldering kits, let me clarify some issues related to silver soldering basics and technique. What is silver soldering? What are the types of silver solder? What tools are needed to perform silver soldering? In this article you will find answers to all the above and more. Let’s get started.
What is silver soldering?
Silver soldering is the process of permanently joining two pieces of metal together by heating these pieces, melting the filler metal – pieces of silver solder – and apply it to a prepared joint. Silver soldering is a very universal skill to have. With it you can repair lots of things as it joints lots of metals together.
What are the types of silver solder?
Depending on the melting temperature, silver solder is divided into four types: hard, medium, easy and extra easy. Melting point of each type of solder is stated in the table below.
| Type of solder | Melting Point |
| Extra Easy | 655 – 710°C (1270°F) |
| Easy | 705 – 725°C (1325°F) |
| Medium | 720 – 765°C (1390 °F) |
| Hard | 745 – 780°C (1490 °F) |
What tools are needed to perform silver soldering?
To perform silver soldering you will need the following basic tools and accessories:
- Silver Solder
- Flux
- Gas/propane torch
- Fire Brick
- Helping hands/locking tweezers
- Safety glasses
Note: Wearing safety glasses is essential!
What is flux?
Flux is a chemical agent that is used before and during soldering process. Its aim is to clean the surface of the metals and protect them from re-oxidation during heating process and to allow the solder to flow into the areas that should be put together. Flux comes in different forms: liquid, paste or powder.
Note: If flux is in a powder, it should be mixed with water to the consistency of a cream. The type of flux you use depends on the type of the silver solder. For instance, I prefer to use Easy Flow No 2, therefore I use Easy Flow No 2 flux.
Without flux silver soldering doesn’t make any sense: you won’t be able to perform it, as simple as that. Flux is a non-replaceable component in any soldering process.
Tips to perfect silver soldering
- 1. Clean metal
Remove all the oxides from the surface of the silver, remove masking tape residue, marks from pencils or marking pens, polishing or buffing compounds, any grease or oils. Even fingerprints will stop solder from flowing.
- 2. Good fit
All pieces MUST have excellent contact with each other. Note that silver solder will not fill up any gaps! Especially, if you want to repair the pipes.
- 3. Apply flux
This special stuff – soldering flux – must be applied to each metal surface of the joint.
- 4. Apply heat
You can use any torch you have, a propane blow torch, for instance. It’s always better to have various interchangeable nozzles. In most of the jobs you would need a 1-inch diameter nozzle: it would generate enough heat for the simple soldering you have to make.
- 5. Apply silver solder
 Heat the metal till it starts to discolor and apply small pieces of silver solder. You will see when it starts melting and flows into the joint. After 2-3 seconds pull the heat away.
- 6. Cool down
The piece should be cooled down.
- 7. Cleaning
Once cooled, the piece should be placed in the pickle solution for cleaning.
- 8. Polishing
After cooling down and cleaning, the joints should be polished.
Example: let’s repair two copper pipes
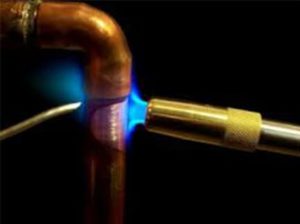
 Clean the pipes and apply the flux neatly and evenly to the end of the pipe. Don’t get the flux all the over the place, because wherever the flux is the solder will run. Once you have applied the flux, fix the ends pipes together and start heating the joint.
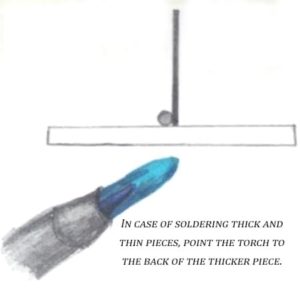
Point the torch in such a way, that the heat is behind the fittings: this way it’s easy to boil off the water of the flux. When the flux takes watery appearance and bubble a little bit. It should dry first, become a bit crusty and then turn into liquid, and this the time to touch it with the rod of silver solder. You really need a very-very small amount and it will flush around the joint and soldering is done.
If you hold a silver solder for too long, you will have a drip that you definitely don’t want. If the flame is not hot enough for a silver solder to flush around; however, if you have the torch too, the silver solder would boil.
After soldering the work should be cooled down. Once done, put it in the cold water. However, I always place mine in the pickling bath to clean. I prefer to use Kilrock K substance. It’s a formic acid and a very nasty stuff. So, make sure you always wear a safety glasses.
After cooling down the joints, you need to polish the item. First, I apply some abrasive soap to the wheel, and start polishing the pipe very carefully and slowly.
And now let’s have a look at silver soldering kit.
SFC TOOLS Standard Jewelry Soldering Kit with Silver Solder Wire Kit-1750 Review
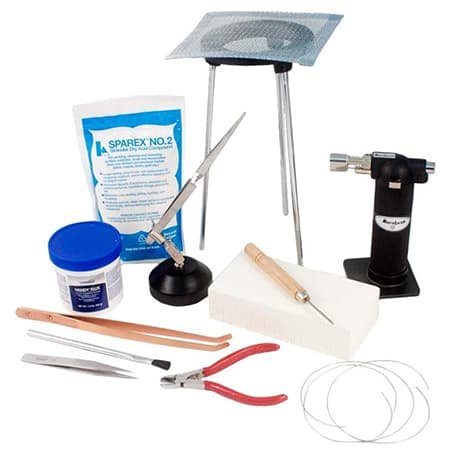
As you have already learnt what exactly you need to start silver soldering, have a look at this kit. It comes with all tools and supplies required and you may start soldering immediately! The kit features mini butane torch, sparex pickle compound, handy flux, magnesia soldering block, copper tongs with curved tip, silver solder wire, tweezers (boley style), third hand w/tweezers, tripod with mesh screen, Eco solder pick, wire cutter (style and PVC color may vary), utility flux brush.
Using this kit, you can make some jewelry repairs: solder broken chain ends, jump rings, or any other piece of jewelry to close or connect them together (pedant, charms, and more). Yes! And don’t get surprised! My little sister asked me once to repair her silver chain, and as I’ve managed to do the job perfectly well, at times I did some small repairs for her. Well, I have a confession to make, these jewelry repairs sometimes are more challenging that pipes soldering. So, don’t make a mistake of thinking that it’s very easy! Maybe you will try it one day.
Conclusion
As you can see, there are not so many fully assembled silver soldering kits. However, I do believe that after reading this post you have an idea what basic tools and accessories are need to start silver soldering. And I’m pretty sure that you would be able to pick up everything you need and assemble the perfect kit yourself.
FAQ
Why is the process called “silver” soldering?
This process is called silver soldering as the filler material contains silver. A silver soldered joint looks like a sandwich: two layers of metal and filler material (silver solder) in between.
What is silver solder made from?
Generally, silver solder alloy contains: 65% fine silver, 20% copper, and 15% zinc.
What metals can be silver soldered?
Silver Solder can be used to join most of the metals, including dissimilar metals, copper, brass, mild steel, stainless steel, cast iron, bronze, and others.
What metals cannot be silver soldered?
Aluminum cannot be silver soldered.
What is pickle solution used for?
Pickle is an acid solution, helping to easier removal of surface oxides after soldering.
