In this post I want to talk about the Arduino Nano: pinout, wiring diagram and programming.
What is an Arduino Nano?
Arduino Nano is the smallest, typical microcontroller board based on ATmega328P microcontroller made by Atmel. Arduino Nano board dimension is 18 x 45 mm.
Where is the board used?
Nowadays Arduino Nano board is used in thousands of various projects, from everyday robotic arm projects to extremely complex scientific instruments, automation electronic projects, embedded systems, and more.
It is also suitable for projects where a wireless connection is not required. The board can be easily used not only by the professionals and experts, but hobbyists, students, novices and people with initial technical background.
Table of Contents
Technical Characteristics
Let’s get started with the Arduino Nano specifications, or general technical characteristics.
| Arduino Nano | Description |
| Microcontroller | Atmega328P/Atmega168 |
| Operating Voltage | 5 V |
| Power supply (Operating Voltage) | 7 V – 12 V |
| Flash memory | 16 KB (ATmega168) or 32 KB (ATmega328) |
| Current consumption | 19 mA – 180 mA |
| Current consumption Deep Sleep | 23 µA (with special settings) |
| Clock Speed | 16 MHz |
| SRAM | 1 KB or 2 KB |
| EEPROM | 512 B or 1 KB |
| USART | Yes |
| Digital I/O Pins | 14 |
| Digital I/O Pins with PWM | 6 |
| Analog Input Pins | 8 (A0 – A7) |
| SPI/I2C/I2S/UART | 1/1/1/1 |
| DC Current per I/O Pin | 40 mA |
| DC Current for 3.3V Pin | 50 mA |
| Communication | IIC, SPI, USART |
| USB | Mini-b |
| Length/width | 42 mm/18 mm |
| Weight | 7 g |
The main difference between them is in microcontroller: Nano v.2 uses Atmega168, whereas Nano v.3 has Atmega238.
The memory difference between Atmega 328 and Atmega 168 is as follows:
- Atmega 328 has 32 KB of flash-m emory with 1 KB of EEPROM and 2 KB of SRAM;
- Atmega 168 has 16 KB of Flash-memory with 512 KB of EEPROM and 1 KB of SRAM.
The Arduino Nano doesn’t use a standard USB in order to connect with a computer; it comes with a Mini-b USB cable.
Arduino Nano Input and Output
Arduino Nano has 14 digital pins and each of them can be used both ways: as input and output. Moreover, each pin can provide or receive a current of 40 mA maximum and operate at 5V voltage as maximum.
The Arduino Nano features 8 analog inputs, and either of which can provide 10 bits of resolution (e.i. analogue input can give 1024 different values). Note that analog pins 6 and 7 cannot be used as digital pins.
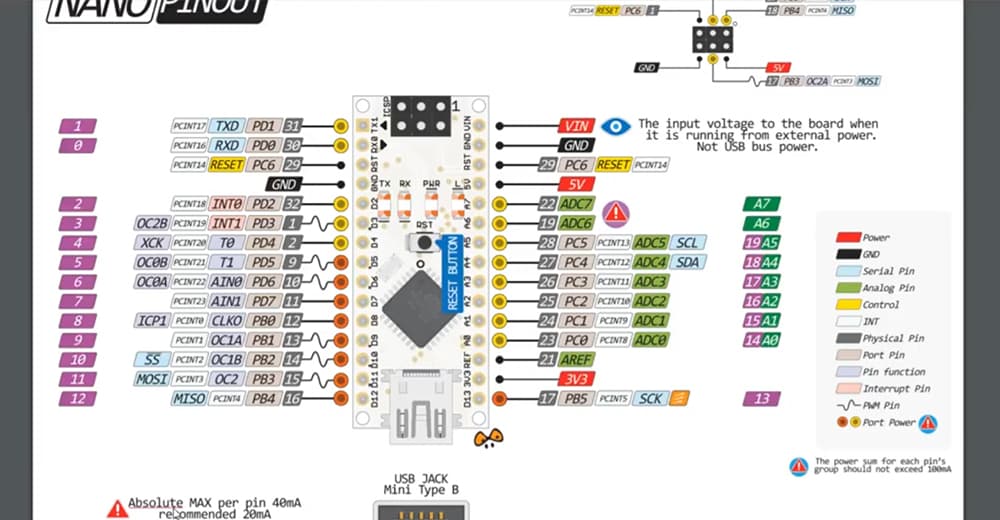
Arduino Nano Pinout Description
Arduino Nano Pinout contains 14 digital pins, 8 analog pins, 2 reset pins and 6 power pins. Specific functions are assigned to each of the pin, as shown in the table below.
| Pin Number/Name | Pin Category | Pin Description |
| Vin, 3.3V, 5V, GND | Power | Vin: The input voltage to Arduino board when it is using an external power source
5V: This pin outputs a regulated 5V from the regulator on the board. 3.3V: Can be used to power other external components which use a 3.3V connection GND: Ground pins: any of which can be used to ground your circuit
|
| Reset | Reset | The pin is used to reset the microcontroller. |
| A0 – A7 | Analog Pins | The pins are used to measure analog voltage in the range of 0-5V |
| Digital Pins D0 – D13 | Input/Output Pins | Can be used as input or output pins. 0V (low) and 5V (high) |
| (0) Rx, (1) Tx | Serial | The pins are used to receive (Rx) and transmit (Tx) TTL serial data. |
| 2, 3 | External Interrupts | The pins are used to trigger an interrupt on a low value or a change in value, a rising or falling edge. |
| 3, 5, 6, 9, 11 | PWM | Each of these pins is used to provide a Pulse Width Modulation (PWM) signal of 8-bit resolution. The signal can be generated with the analog function. |
| 10 (SS), 11 (MOSI), 12 (MISO) and 13 (SCK) | SPI | The pin is used for SPI communication. |
| 13 | In-built LED | In-built LED is connected to the digital pin 13. The pin is used to turn on the LED: when the voltage at the pin is high, the LED is on, when it is low, it’s off. |
| A4 (SDA), A5 (SCA) | I2C | The pin supports I2C (TWI) communication using the Wire Library. |
| AREF | AREF | The pin is used to provide reference voltage for analog inputs. |
Note: Analogue pins can function as an analogue to digital converter and A4 and A5 pins can be used for I2C communication. Furthermore, Arduino Nano features 14 digital pins and 6 out of them are with PWM (in other words, they are used to generate Pulse Width Modulation).
These digital and analog pins can be assigned with multiple function, but their main one is to be configured as output or input.
How to power Arduino Nano?
The Arduino Nano doesn’t come with a standard DC power jack; and that means that you cannot supply an external power source through a battery. However, you can power your Arduino Nano board by 3 totally different ways:
- Using Mini-B USB cable: You need to connect the board to a computer through a mini-b USB cable or to a phone charger;
- Using Vin Pin: If you are going to us-e an external power source, use Vin Pin (one of the input voltages to Arduino board). It’s input power supply voltage to the Arduino board when using unregulated external power source of 6 up to12V;
- Using 5V Pin: In case of 5V regulated external power supply you can directly connect it to this pin. It is a regulated power supply voltage to the board.
Note: Once the Arduino board is connected to the power source, the board automatically selects the one with the highest voltage.
What are Arduino Nano facilities for communication?
The Arduino Nano can communicate with another Arduino, a computer, or any other microcontroller. Serial communication is available on digital pins 0 (RX) and 1 (TX): Rx is used to receive the data and Tx is for transmitting the data. A serial monitor, which is a part of the Arduino software, provides for textual data to be sent to and from the Arduino Board.
The Arduino Nano has an FTDI chip (driver) installed on the board. This chip allows to convert USB to a standard serial signal. Once the data is being transmitted via FTDI chip and USB connection to the computer, the Rx and Tx Leds on the Arduino Nano are going to blink (however, not in the case of serial communication on 0 pin and 1 pin).
The Arduino Software Serial Library is for carrying out a serial communication between the Nano and the computer.
I2C and SPI communication is also possible via Wire Library of the Arduino Software.
How to program the Arduino Nano?
You can program your Arduino Nano board using the Arduino software (you can download it here).
From the Tools ˃ Board Menu select “Arduino Nano w/Atmega328” and download. There are two options to program the controller:
- by the bootloader;
- by using ICSP (in-circuit serial programming header).
The Arduino Nano is compatible with Windows, Max or Linus, but Windows are a preferred option.
This beginner Arduino tutorial “How to program Arduino Nano” is for those who doesn’t have any electronic experience whatsoever!
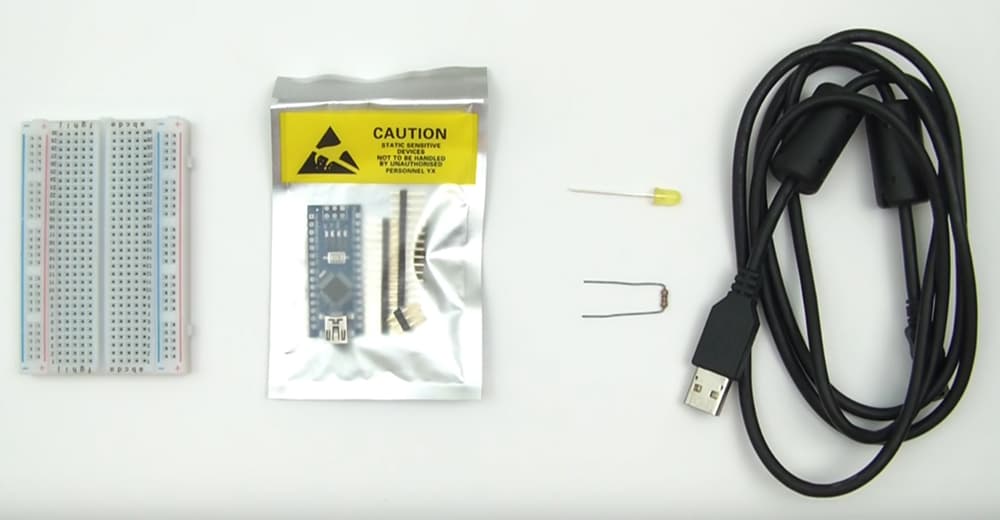
Look at the picture below and see what I have to start with: a breadboard, a LED (a yellow one), a resister, mini USB cable, and a microcontroller.
Let’s have a look at the breadboard. Basically, the only thing you need to do is to push the components into the existing holes. Next to it is a microcontroller (by the way, they are surprisingly cheap, a few dollars). Microcontroller is the brains of the operation and the main component of this tutorial. In the middle of the microcontroller you can see a small black square. It’s a chip which we are going to manipulate to make that LED blink. I’m going to show you how to do it and keep it really simple.
So, you are going to need:
- A breadboard
- A yellow LED (you can get them via eBay)
- A 47 Ohm resistor
- An Arduino Nano
- A mini-b USB cable (I’m going to explain why I will need it)
- And a computer
To start with, let’s have a quick look at this microcontroller.
There are different types of Arduino boards (Arduino Uno, Due, mega etc.), but Arduino Nano is really good for beginners and it’s very simple to use.
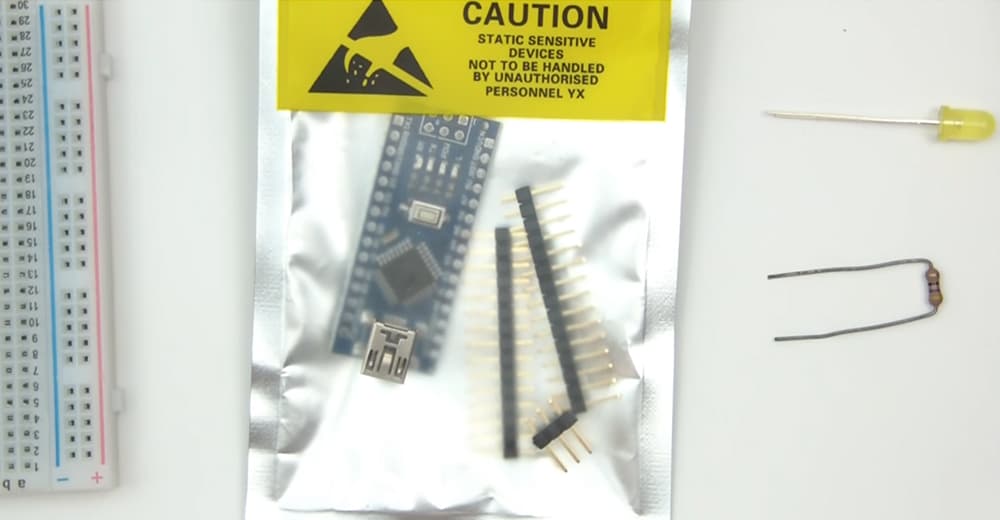
If you look at the package bag, the first you can see a note on a yellow background: “CAUSION. Static sensitive devices not to be handled by unauthorized personnel”. Therefore, be certain you get a permission from somebody who’s authorized. Let’s open it.
This is an Arduino Nano and there is a little chip which is the brain of the whole thing. There is a little switch on here and there is a USB socket.
Yearlier I’ve mentioned a mini USB. What you do is plug one end in here (in this mini USB) and plug the other end into a PC or a laptop.
These little holes here are easier for you to solder on. If you don’t want to sold (if you don’t have a soldering iron) just buy a presoldered one and you don’t need to do any more soldering.
For those who are going to solder by yourself I’m going to show you how to do it. I usually just put pins in, then push it into a breadboard (and it holds it for me) which makes my work easier.
When I begin solding, I usually start from the furthest away. Sometimes if the sold lines get dirty, I just whack it on a hard surface. As a result, the plastic bit and the rubbish comes off.
Then you have to solder the other side exactly in the same way.
Small tip: When you are soldering is something is not holding still, you can put something underneath the other side.
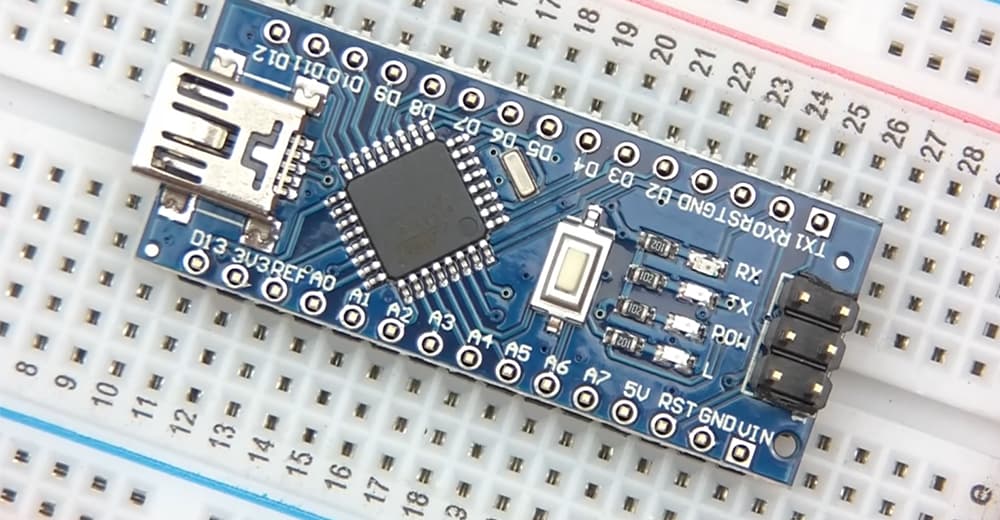
Now we’re done with soldering. And we need this breadboard for connecting things together.
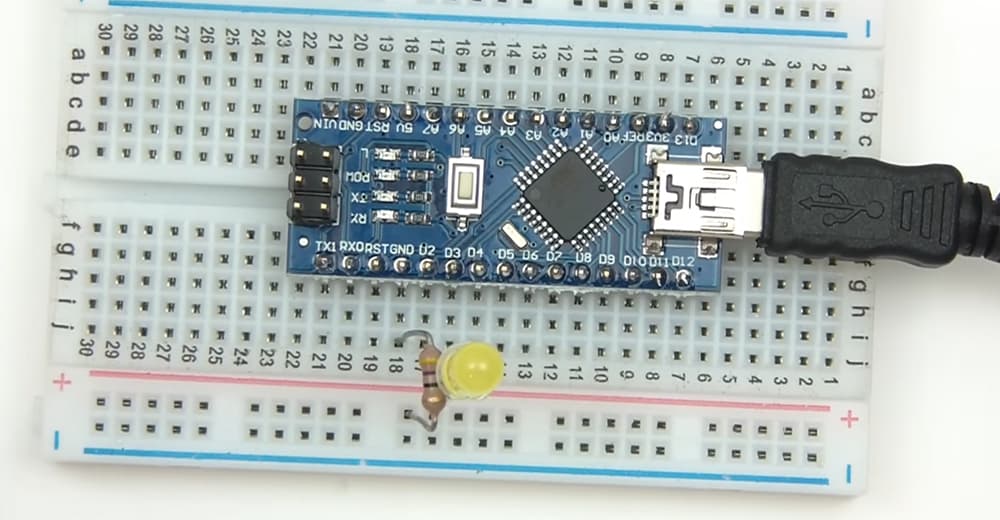
We’ve got the Arduino Nano pushed into the breadboard now, and the next thing we want to do is add in the LED. If you take your LED, you’ll notice that there’s a long side and a short side. The long side is plus (+) and the short side is negative (-). We get the long side and just push it into where it says D2.
You see little holes, and they all are linked in a line. Push the long side of the LED into any of the holes of D2 and the short one join it over to the rail (look at the picture above), so the short side is in the rail.
Now get your resistor. The hole next to the LED will be minus (look at the picture above). Push the resistor in there, and then push the other side into the ground pin.
Now you have the resistor in the same rail as the minus pin of the LED. What’s going to happen is that D2 is going to provide it with a voltage. It’s going to be a circuit from D2 across LED and then through the resistor underground. The resistor protects the LED from too much current.
What you need to do next is to plug the mini USB in, and then plug the mini USB into the computer or the laptop.
The way this works is as follows. There is a hardware side and a software side. And we’ve done the hardware side, and now we need a software side. What I mean by the software side is that you’ve got to write a small program which gets flashed onto the little chip. What I mean by flashed is basically you write a program and it gets popped onto the chip, and then the chip runs that program constantly which you write. To be able to do this, you need some software.
If you just go to a search and type in Arduino or Arduino CC, you’ll see the Arduino home page. Go on to that and then go to Software, then go to download the Arduino IDE. Click on windows installer.
When it’s downloaded, click on it and it should come up opening Arduino. It will ask you to install it. After installatioon you have to press NEXT. When it’s finished, you should find that there is a blue icon with a white infinity symbol. That’s Arduino Studio. Click in this icon, and then there will be a window, requesting a code. Just to make sure, go to File and then press New and New comes up.
This is where you write in the code to be able to flash over to the Arduino. At this point, you’ve got the Arduino plugged in. Go to tools, and then go to board. Make sure you choose the Arduino Nano, because it is what we are using.
Make sure you got the following information:
Processor Atmega 328; then select AVR-ISP-MK2.
Then you have to choose a port. If you got several ports, you have to work out which port it is (COM4)
1. Select the port that’s appropriate and then let’s write a code. Write “pinMode”, then open bracket and write “2” and then “output”: (2,OUTPUT).
This code loop repeats forever. We write here “digitalWrite” (2,HIGH), which means “get pin 2 and set it high”.
Then we want to delay the program for 1000 miliseconds. For that we need to write “delay(1000)”. Then text “digitalWrite (2,LOW). After that for another delay for 1000 miliseconds you should text “delay (1000)”.
The sketch is complete. It should look like this:
pinMode(2, OUTPUT)
digitalWrite (2, HIGH)
delay(1000)
digitalWrite (2, LOW)
delay (1000)
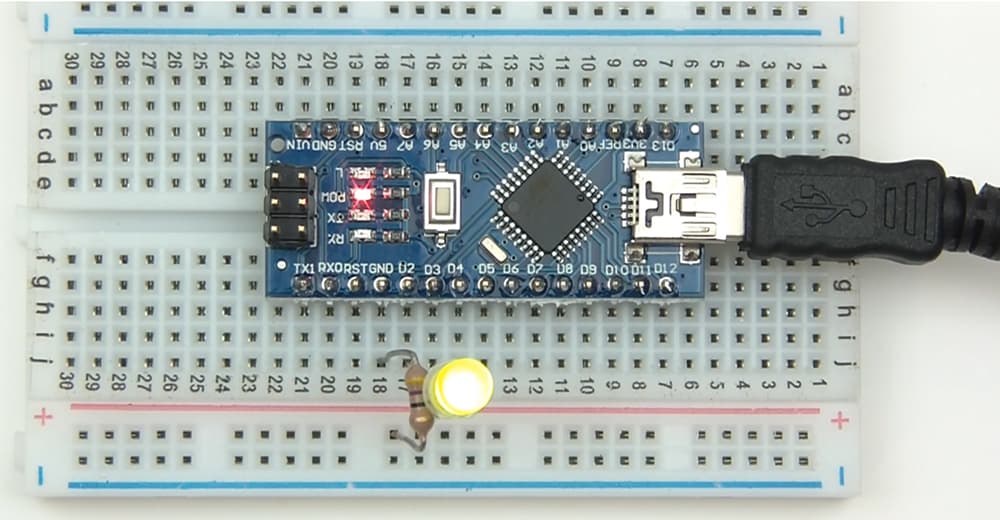
What we have: with 2, HIGH the LED on, then we wait for 1 second, then we with 2, LOW the LED off, then we wait for 1 second and the loop repeats.
Our LED start blinking.
We’ve done this, just click upload. It might ask you to save it. Upload it into IOS board.
If we go back to Arduino now you can see that it’s blinking according to what we’d written in that small program.
Here’s how to program Arduino Nano.
Hope now you realize how easy it is to do it. Of course, it was the simple introduction to the programming but you’ve got an idea anyway.
How to reset the Arduino Nano?
Basically, there are two ways to reset the Arduino Nano: programmatically and electronically.
Programmatical method:
The Arduino Nano comes with an in-built RESET function. The board will reset automatically once this function is called. To reset the Nano programmatically, you can upload the following program:
void(* resetFunc) (void) = 0;
void setup() {
Serial.begin(9600);
Serial.println(“How to Reset Arduino Programmatically”);
Serial.println(“www.TheEngineeringProjects.com”);
delay(200);
}
void loop()
{
Serial.println(“A”);
delay(1000);
Serial.println(“B”);
delay(1000);
Serial.println(“Now we are Resetting Arduino Programmatically”);
Serial.println();
delay(1000);
resetFunc();
Serial.println(“Arrduino will never reach there.”);
}
Electronic method:
You need to do the following:
- Connect the reset pin of the Nano with any of the digital pins on the controller. When setting up this connection, add 1K or 2K Om resistor.
- Use the digital pin as an output and keep it HIGH before the reset.
- When you are ready to make a reset, set the pin to LOW.
To reset the board electronically, you can use the program below:
int Reset = 4; void setup() { digitalWrite(Reset, HIGH); delay(200); pinMode(Reset, OUTPUT); Serial.begin(9600); Serial.println(“How to Reset Arduino Programmatically”); Serial.println(“www.TheEngineeringProjects.com”); delay(200);}void loop() { Serial.println(“A”); delay(1000); Serial.println(“B”); delay(1000); Serial.println(“Now we are Resetting Arduino Programmatically”); Serial.println(); delay(1000); digitalWrite(Reset, LOW); Serial.println(“Arduino will never reach there.”); }
Arduino Nano Pinouts Video

Conclusion
The Nano is the smallest Arduino board available in the modern market. This breadboard friendly device is very easy to use even for those who wants to make their first steps with microcontrollers. The Nano can be used for multiple DIY projects, various applications, projects with multiple communications and I/O interfaces, and more.
Compared to other Arduino boards, instead of DC power jack, the Nano comes with a mini-USB port. And the biggest advantage of this Nano board is that it able to pick up the strongest power source with its potential difference.